Showing posts with label VirtualBox. Show all posts

Monday, 17 September 2018

Local Kubernetes Cluster on CentOS7 with Vagrant and VirtualBox on your Windows Laptop Part I

Updates

03.11.2018

The Vagrantfile has been updated due to changes in Kubernetes` documentation:
  • now adding Docker-CE Repository and installing Docker-CE explicitly
  • minor changes of adding Kubeadm-Repo
  • Kubernetes and Docker now using cgroupfs cgroup driver (instead of systemd)
  • New URL to install and configure Flannel Overly Network
Check out the new Vagrantfiles here or perform the steps from the updated shell provisioner manually.

Without these changes the master node didn't reach state "ready" any more, due to network problems.
Now it works like a charm again.

What this post is about

This post is about setting up a real kubernetes cluster consisting of 1 master node and as many worker nodes as you like (or your machine can spin up) within a local network on your laptop.

You can easily spin up a kubernetes minkube on your machine, but may be you prefer something a little bit closer to the real thing, like running each node on a separate VM connected via some private network within your host.

I promise that setting up a cluster of consisting of one master node and two worker nodes will be as easy as using minikube.

This post consists of three parts:
  1. Set up the cluster "out of the box" (this post)
  2. Explaining the Vagrantfiles for master and workers in detail
  3. Customizing the Vagrantfiles 

What you need up front

I'm doing this on my Windows 10 machine using VirtualBox for spinning up the VMs that constitute the cluster nodes and Vagrant to automate VirtualBox.
All nodes will be running CentOS 7

On your Windows machine, you need to have a virtualization software running. I'm using VirtualBox.
Additionally you need to have Vagrant installed.

In case you do not have these installed already, they are really easy to get. Go to their respective download sites, download the installers and install first VirtualBox, then Vagrant. I'm using this combination for years and never encountered any serious problems.

Why Vagrant?

Using Vagant, we can automate the process of provisioning the nodes.
Once we have created the "Vagrantfile" for the master node, one command, "vagrant up", will spin up VM running the master.
Each worker node we want to add, has its respective and even less complex Vagrantfile in another directory and can be started with another "vagrant up" respectivly.

All provisioning is done within the vagrantfiles for master and workers respectively.
Every step performed there, will be explained below.

Part I: Setting Up The Cluster "As Is"

Check Your Environment

As mentioned you need VirtualBox (or some other virtualization tool) and Vagrant running on your machine.
To check your environment, open a shell (I'm using Git Bash in all examples) and type "vagrant version":
Check Vagrant Version

To check your VirtualBox just open the GUI.
About VirtualBox
You can use "Check for Updates" in order to make sure you are on the latest release.

Get the Project

Open your Git Bash and create a directory for the project.
For example, let's create the directory "mycluster":
# create the "mycluster" directory:
$ mkdir /c/mycluster
$ cd /c/mycluster

Clone the project from GitHub.
This will get you the directories for the master node and tow worker nodes containing the respective Vagrantfiles.
# clone from GitHub:
$ git clone https://github.com/vkoster/k8s-local.git
Cloning into 'k8s-local'...
remote: Counting objects: 29, done.
remote: Compressing objects: 100% (14/14), done.
remote: Total 29 (delta 10), reused 29 (delta 10), pack-reused 0
Unpacking objects: 100% (29/29), done.

Change into the "k8s-local" directory and check what you got:
# see what you got:
$ ls -al
total 24
drwxr-xr-x 1 vkoster 1049089 0 Sep 15 23:49 ./
drwxr-xr-x 1 vkoster 1049089 0 Sep 15 23:49 ../
drwxr-xr-x 1 vkoster 1049089 0 Sep 15 23:49 k8s-local/

$ cd k8s-local
$ ls -al
total 14
drwxr-xr-x 1 vkoster 1049089   0 Sep 15 23:49 ./
drwxr-xr-x 1 vkoster 1049089   0 Sep 15 23:49 ../
drwxr-xr-x 1 vkoster 1049089   0 Sep 15 23:49 .git/
-rw-r--r-- 1 vkoster 1049089  96 Sep 15 23:49 .gitignore
drwxr-xr-x 1 vkoster 1049089   0 Sep 15 23:49 cl2master/
drwxr-xr-x 1 vkoster 1049089   0 Sep 15 23:49 cl2nfs/
drwxr-xr-x 1 vkoster 1049089   0 Sep 15 23:49 cl2node1/
drwxr-xr-x 1 vkoster 1049089   0 Sep 15 23:49 cl2node2/
-rw-r--r-- 1 vkoster 1049089 897 Sep 15 23:49 README.md
-rw-r--r-- 1 vkoster 1049089  55 Sep 15 23:49 TODO.md

We are interested in these directories:

  • cl2master
    this is where the master node will be created
  • cl2node1 and cl2node2
    this is where the worker nodes will be created
(Ignore the cl2nfs directory for now. Its part of another post)

Create the Master Node

Let's create the master node. Change into the master node directory and do the "vagrant up":
# creating the master node:
$ cd cl2master
$ vagrant up
...
*** a lot of terminal output ***
...
    default:
    default: Your Kubernetes master has initialized successfully!
    default:
    default: To start using your cluster, you need to run the following as a regular user:
    default:
    default:   mkdir -p $HOME/.kube
    default:   sudo cp -i /etc/kubernetes/admin.conf $HOME/.kube/config
    default:   sudo chown $(id -u):$(id -g) $HOME/.kube/config
    default:
    default: You should now deploy a pod network to the cluster.
    default: Run "kubectl apply -f [podnetwork].yaml" with one of the options listed at:
    default:   https://kubernetes.io/docs/concepts/cluster-administration/addons/
    default:
    default: You can now join any number of machines by running the following on each node
    default: as root:
    default:
    default:   kubeadm join 192.168.2.10:6443 --token 14q1vx.z9nxyuc49e9v7rot --discovery-token-ca-cert-hash sha256:c9f757102120d5f776ddb05ac533ee3fb5e5006773f81953ed4753e8000da775
    default: Schritt 11 erledigt: Achtung - den 'kubeadm join' muss man sich sichern!
    default: Step 11 done: important - you must save the kubeadm join command for joining nodes later!
    default: ------------------
    default: Schritt 12: Konfiguration ins Home-Verzeichnis von vagrant kopieren
    default:  Step 12: copy configuration in vagrant's home directory
    default: ===================================================================
    default: Schritt 12 erledigt
    default: Step 12 done
    default: -------------------
    default: Schritt 13: Overlay Netzwerk installieren (wir verwenden Flannel)
    default: Step 13: installing overlay network (we are using Flannel here)
    default: =================================================================
    default: clusterrole.rbac.authorization.k8s.io/flannel created
    default: clusterrolebinding.rbac.authorization.k8s.io/flannel created
    default: serviceaccount/flannel created
    default: configmap/kube-flannel-cfg created
    default: daemonset.extensions/kube-flannel-ds created
    default: Schritt 13 erledigt
    default: Step 13 done
    default: -------------------

Now you need a little patience.
Vagrant will bring up the machine, update it, prepare it for running as a Kubernetes Master Node and finally install and run Kubernetes.
You can track what is going on by checking the steps outlined in the Vagrantfile.

During Step 11 Kubernetes will output "join command" for joining subsequent nodes to the cluster. You should copy and save this somewhere. You will need this command and the join-token to add worker nodes to the cluster later on.

Looking at the output of the last step (Step 13), you should be able to verify that the Flannel overlay network was installed successfully. When joining nodes to the cluster, the overlay network will be extended to those new nodes automatically.

Ok, you now have Kubernetes Master Node running on your machine:

  • hostname: cl2master
  • ip: 192.168.2.10
  • running in a private 192.168.2.0/24 network
Let's check if everything is working fine by ssh-ing into the VM and listing the Pods running in the "kube-system" namespace:
# see that the master node is working:
$ vagrant ssh
[vagrant@cl2master ~]$

# you are now inside of your new vagrant box...
# check the "kube-system" namespace:
$ kubectl get pods --namespace kube-system
NAME                                READY     STATUS    RESTARTS   AGE
coredns-78fcdf6894-hhmgb            1/1       Running   0          18h
coredns-78fcdf6894-j5mkx            1/1       Running   0          18h
etcd-cl2master                      1/1       Running   0          18h
kube-apiserver-cl2master            1/1       Running   0          18h
kube-controller-manager-cl2master   1/1       Running   0          18h
kube-flannel-ds-dxgc8               1/1       Running   0          18h
kube-proxy-tmtwc                    1/1       Running   0          18h
kube-scheduler-cl2master            1/1       Running   0          18h

Apart from the AGE column, your output should be something like the above.
Type "exit" to leave the box for now and find yourself in your GitBash again.

A Master Node is quite useless by its own because without taking explicite action, Kubernetes will not schedule your deployments on a Master Node. So let's join two Worker Nodes.

Create and Join Two Worker Nodes

Simple change into the "cl2node1" directory and again type "vagrant up":
# create the first worker node
$ cd ../cl2node1/
$ ls -al
total 12
drwxr-xr-x 1 vkoster 1049089    0 Sep 15 23:49 ./
drwxr-xr-x 1 vkoster 1049089    0 Sep 15 23:49 ../
-rw-r--r-- 1 vkoster 1049089 5492 Sep 15 23:49 Vagrantfile

# now the "vagrant up":
$ vagrant up
...
default: Complete!
    default: kubelet Dienst starten
    default: Created symlink from /etc/systemd/system/multi-user.target.wants/kubelet.service to /etc/systemd/system/kubelet.service.
    default: Schritt 9 erledigt
    default: Step 9 done
    default: ------------------
    default: Schritt 10: schon mal die wichtigsten Images pullen
    default: Step 10: pulling down some images for later
    default: ===================================================
    default: [config/images] Pulled k8s.gcr.io/kube-apiserver-amd64:v1.11.3
    default: [config/images] Pulled k8s.gcr.io/kube-controller-manager-amd64:v1.11.3
    default: [config/images] Pulled k8s.gcr.io/kube-scheduler-amd64:v1.11.3
    default: [config/images] Pulled k8s.gcr.io/kube-proxy-amd64:v1.11.3
    default: [config/images] Pulled k8s.gcr.io/pause:3.1
    default: [config/images] Pulled k8s.gcr.io/etcd-amd64:3.2.18
    default: [config/images] Pulled k8s.gcr.io/coredns:1.1.3
    default: Schritt 10 erledigt
    default:  Step 10 done
    default: ------------------
Setting up a Worker Node is done after completing step 10 of the Vagrantfile. You should see something like the above at the end of the terminal output. No we have to make this node join the cluster. You do this by running the join-command generated by Kubernetes while setting up the Master Node:
# joining this node to the cluster
$ sudo kubeadm join 192.168.2.10:6443 --token 14q1vx.z9nxyuc49e9v7rot --discovery-token-ca-cert-hash sha256:c9f757102120d5f776ddb05ac533ee3fb5e5006773f81953ed4753e8000da775
...
This node has joined the cluster:
* Certificate signing request was sent to master and a response
  was received.
* The Kubelet was informed of the new secure connection details.

Run 'kubectl get nodes' on the master to see this node join the cluster.
You should see something like this at the end of your terminal output. At the end, Kubernetes tells us how to check whether this worked. To do this, exit the worker node vm, re-enter the Master Node directory, ssh into the box and run the "get nodes" command with kubctl:
# exit vm
$ exit

# now back in GitBash
$ cd ../cl2master/

# enter master node
$ vagrant ssh

# now inside master vm
$ kubectl get nodes
NAME        STATUS    ROLES     AGE       VERSION
cl2master   Ready     master    22h       v1.11.3
cl2node1    Ready         21m       v1.11.3
Type "exit" to leave the master and enter GitBash again.
OK, now we have a cluster consisting of one master and one worker node. Adding the second worker node is exactly the same procedure as adding the fist. Just make sure to change into the "cl2node2" directory:
# now in GitBash - cl2master directory...
$ cd ../cl2node2

# do the "vagrant up"
$ vagrant up
... lots of noise...
...
    default: Complete!
    default: kubelet Dienst starten
    default: Created symlink from /etc/systemd/system/multi-user.target.wants/kubelet.service to /etc/systemd/system/kubelet.service.
    default: Schritt 9 erledigt
    default: Step 9 done
    default: ------------------
    default: Schritt 10: schon mal die wichtigsten Images pullen
    default: Step 10: pulling down some images for later
    default: ===================================================
    default: [config/images] Pulled k8s.gcr.io/kube-apiserver-amd64:v1.11.3
    default: [config/images] Pulled k8s.gcr.io/kube-controller-manager-amd64:v1.11.3
    default: [config/images] Pulled k8s.gcr.io/kube-scheduler-amd64:v1.11.3
    default: [config/images] Pulled k8s.gcr.io/kube-proxy-amd64:v1.11.3
    default: [config/images] Pulled k8s.gcr.io/pause:3.1
    default: [config/images] Pulled k8s.gcr.io/etcd-amd64:3.2.18
    default: [config/images] Pulled k8s.gcr.io/coredns:1.1.3
    default: Schritt 10 erledigt
    default:  Step 10 done
    default: ------------------

# enter the new node via ssh to run the "Join-Command":
$ vagrant ssh

# now inside the new node...
$ sudo kubeadm join 192.168.2.10:6443 --token 14q1vx.z9nxyuc49e9v7rot --discovery-token-ca-cert-hash sha256:c9f757102120d5f776ddb05ac533ee3fb5e5006773f81953ed4753e8000da775
...
This node has joined the cluster:
* Certificate signing request was sent to master and a response
  was received.
* The Kubelet was informed of the new secure connection details.

Run 'kubectl get nodes' on the master to see this node join the cluster.
Let's check again on the master node:
# exit the node2-box:
$ exit

# change into master node directory
$ cd ../cl2master/

# enter the master node via ssh
$ vagrant ssh

# now inside master node vm...
$ kubectl get nodes
NAME        STATUS    ROLES     AGE       VERSION
cl2master   Ready     master    23h       v1.11.3
cl2node1    Ready               1h        v1.11.3
cl2node2    Ready               32m       v1.11.3

Summary

Now you habe a Kubernetes cluster consisting of one master and two worker nodes running on your lokal machine. The respective VMs are configured like so:

  • master node
    • hostname: cl2master
    • ip: 192.168.2.10
  • worker node 1
    • hostname: cl2node1
    • ip: 192.168.2.11
  • worker node 2
    • hostname: cl2node2
    • ip: 192.168.2.12
The next post will discuss the Vagrantfiles for master and worker nodes respectively.

Disclaimer

The descriptions above worked for me every time up to the time of this writing. Nevertheless I can't take any responsibility if something might not work for you now or in the future.


See also:


Monday, 15 February 2016

NodeJS JavaScript Oracle Database Development in a Vagrant powered VirtualBox

1 Abstract

This post describes the process of installing OracleXE, NodeJS and NodeJS Oracle Driver “oracledb” into a Vagrant powered VirtualBox with Linux as Guest OS running on Windows7 as Host OS.

2 Introduction

This is not on the Raspberry Pi and not about CouchDB.
Instead this is about what I experienced in a real life project dealing with NodeJS Oracle-DB development on a Windows machine within a Vagrant powered VirtualBox running Linux.

I would like to share here some of the hurdles we had to overcome In order to make this setup work properly. Hopefully this will help you save some time in case you plan something likewise.

3 Some Background

We started off with the idea to try something different and implement our services as NodeJS-Express modules using Oracle DB for persistence. A first prototype of the software was supposed to be implemented on a Windows developer notebook.
Oracle maintains a NodeJS driver for Oracle DB which can be installed via the Npm repository.
As it turned out, this installation is not as trivial as it sounds. During installation, the module has to be built locally which of course requires some tooling to be present on your machine. Some research (Google) told us that a specific version of Visual Studio combined with a certain .Net version would be required to get the task done.
Frankly speaking and without wanting to hurt anyone’s feelings, I did not want to have this on my machine. I’m using Windows 7 and given the current state of my machine, I was not sure if I would ever be able to install the required components in their respective versions.
The idea was born to bring up a Vagrant powered VirtulaBox running Linux and to install OracleXE, NodeJS and the oracledb driver into this box. Good enough for a prototype and much easier to share and discuss with others.

The rest of the blog deals with the hurdles to jump while setting up this environment making the assumption that you have Vagrant and VirtualBox already installed on your Windows machine. 
Talking about hurdles I should mention that you may well get away with this without stumbling over anything at all. Don’t sue me for wasting your time.
On the other hand you might come across pitfalls not mentioned here. In this case I would appreciate a note which I will compile to the list.

Let’s start.

The whole process consists of two very distinct tasks/ projects:
  • Engineering Task: create a Vagrant Base Box containing OracleXE and NodeJS and prepare it for installing the oracledb driver
  • Development Task: Create a NodeJS project using your new Vagrant Base Box and actually install the oracledb driver into this project
Our goal is to make the Development Task as easy as “npm install oracledb”, so most of our efforts will be invested into the Engineering Task.

4 Engineering Task: Building your Vagrant Base Box

4.1 Selecting a Vagrant Base Box to start with

You can save a lot of time just by choosing an appropriate Vagrant Base image for the task at hand.
Oracle distributes its OralceXE database on Linux as an RPM package. RedHat Linux, the binary compatible CentOS or Fidora use RPM as their package manager.
If you insist to install on Debian, Ubuntu or the like, you have to use tools like “alien” to install from an RPM package. We found this to unnecessarily complicate the installation process. Even after a successful installation, quite some effort has to be invested in getting OracleXE running on Ubuntu. A well written and working description of the process can be found here.

Anyway, we choose CentOS7 64Bit as our Guest OS.
Researching the Atlas-Hashicorp Vagrant Repository, we found the "geerlingguy/centos7" box to fit or needs. It contains a minimal CentOS 7 64 Bit.

On your Windows machine create the root directory of your engineering project (called <eng_root> from now on).
I use my Windows Git-Bash instead of a Windows command shell so that I can use Linux commands inside and outside of my Vagrant Box.

# in your HostOS (Windows) but in Git-Bash...
# create project home directory:
mkdir <eng_root>
cd <eng_root>
#
# let Vagrant create a Vagrantfile for you:
vagrant init –m geerlingguy/centos7
#
# start up the box
vagrant up
#
The “vagrant init” command will create an initial version of your “Vagrantfile”. The Vagrantfile will contain enough information to download the Vagrant Base Box, expand it into a VirtualBox image and load it into VirtualBox. Later in the process we will add some configuration to the Vagrantfile.

“vagrant up” makes Vagrant download the Base Box, import it into VirtualBox and start the VM.
This may take a while because of the download. Once downloaded, Vagrant will use your local copy on every subsequent “vagrant up”.

Vagrant mounts your project's root directory <eng_root> as a shared directory under "/vagrant" within the VirtualBox. “Shared directory” means that you can access this directory and all its sub-directories from your HostOS (Windows) and from within your VM, as you please (once you have ssh-ed into the VM that is).

4.2 Check some preconditions

Your Vagrant Box has to meet some prerequisites for a successful installation of the oracle-node driver later in the development project, due to the fact that the driver has to be built during installation.
We found the following preconditions to be essential for a successful build of oracledb inside of our vagrant box:

4.2.1 Version of binutils

While trying to install the “oracledb” NodeJS driver, we had this error:
Error: expecting string instruction after `rep'» in code w/o inline assembly
It could be traced back to the version of the “binutils” library.
Make sure that your box contains this lib in version of 2.23.52.0.1 or better.
Our CentOS7 box meets this prerequisite:

#
$ sudo yum info binutils
Installed Packages
Name        : binutils
Arch        : x86_64

Version     : 2.23.52.0.1
Release     : 55.el7
Size        : 20 M
Repo        : installed
From repo   : anaconda
Summary     : A GNU collection of binary utilities
URL         : http://sources.redhat.com/binutils
#

4.2.2 Version of C++ compiler

We installed the following version of the C++ compiler:

# 
$ sudo yum install gcc-c++
...
$yum info gcc-c++
Installed Packages
Name        : gcc-c++
Arch        : x86_64
Version     : 4.8.5
Release     : 4.el7
Size        : 16 M
Repo        : installed
From repo   : base
Summary     : C++ support for GCC
URL         : http://gcc.gnu.org
#
Version “4.8.5” works perfectly.

4.3 Install and configure OracleXE

When using CentOS we can follow installation instructions straight from the book. The instructions to follow can be found here. Because we plan to have our development project in the same box as the database, we choose option 4: Node-oracledb Installation on Linux with a Local Database.
Anyway, it can be done like this:
Within your Host OS (Win7 for me), switch into the root directory of the engineering project and create a directory for downloading the software we need. Switch into the project’s root directory, and create a “downloads” directory. Visit the theOracle Download page and download the Oracle XE 11g for Linux into the “downloads” directory.
Oracle Download Page
 The nice thing about Vagrant is that it automatically shares your project root directory (the directory where your Vagrantfile lies) and all sub-directories, between your Host and your Guest-OS. You can now ssh into your box (if it is not running, start it up by typing “vagrant up”) and change into the project root. Vagrant shares this under the name /vagrant.
The Oracle XE zip-file is now in here: “<PROJECT_ROOT>\downloads”. From here on, we will proceed from within your new box. Switch into your project's root directory. If you have not already done so, power up the box, ssh into it and proceed as follows:
# 
# cd <eng_root>
vagrant up
vagrant ssh
#
# now we are within the box
sudo yum install libaio bc flex
sudo yum install unzip
#
# switch into the directory where you put the oracle zip
cd /vagrant/downloads
#
# unzip (make sure to name of the zip-file is correct)
sudo unzip -q oracle-xe-11.2.0-1.0.x86_64.rpm.zip
#
# switch into the newly created Disk1 directory and install the package
cd Disk1/
sudo rpm -ivh oracle-xe-11.2.0-1.0.x86_64.rpm
#

Good. The database is installed, but has to be configured now.
The following has to be done as root (password for root-account in vagrant boxes should be “vagrant”):

#
# password for root should be: vagrant
su –
#
# now call Oracle’s configure script:
/etc/init.d/oracle-xe configure
#
# it will ask you some questions.
# I accepted all the defaults, which are these:
# http Apex port: 8080
# Database Listener Port: 1521
# a password for sys and system account: think of something…
# start OracleDB on startup: yes
#
# When ready, you should see this message:
Starting Oracle Net Listener...Done
Configuring database...Done
Starting Oracle Database 11g Express Edition instance...Done
Installation completed successfully.
#

You now have a box with Oracle XE installed, configured, up and running.
What we need to do now is to set and export a couple of environment variables.
I choose to put these calls into my “~/.bash_profile” file (place it wherever you like, as long as it is executed when you enter the box).

This is how my “~/.bash_profile” looks after editing (you do not need to be root any longer by the way):
# .bash_profile

# 
# Get the aliases and functions
if [ -f ~/.bashrc ]; then
        . ~/.bashrc
fi

# User specific environment and startup programs
. /u01/app/oracle/product/11.2.0/xe/bin/oracle_env.sh

PATH=$PATH:$HOME/bin
LD_LIBRARY_PATH=$ORACLE_HOME/lib
export LD_LIBRARY_PATH
export PATH
#

What is this for:
  • First we have to call an Oracle script that sets and exports some environment variables
  • Next we have to define and export an environment variable that tells Oracle clients where the shared libraries are located, which are needed to connect to the database

You are now able to access your database from within the box, say, via sqlplus. Just ssh into the box and start sqlplus (use the credentials you specified during database configuration):

# 
Last login: Sat Feb 13 11:27:02 2016 from 10.0.2.2
[vagrant@localhost ~]$ sqlplus system/system
SQL*Plus: Release 11.2.0.2.0 Production on Sat Feb 13 19:41:35 2016
Copyright (c) 1982, 2011, Oracle.  All rights reserved.

Connected to:
Oracle Database 11g Express Edition Release 11.2.0.2.0 - 64bit Production

SQL> desc user_tables

 Name                                      Null?    Type
 ----------------------------------------- -------- ----------------------------
 TABLE_NAME                                NOT NULL VARCHAR2(30)
 TABLESPACE_NAME                                    VARCHAR2(30)
 CLUSTER_NAME                                       VARCHAR2(30)
 IOT_NAME                                           VARCHAR2(30)
 STATUS                                             VARCHAR2(8)
 PCT_FREE                                           NUMBER
...
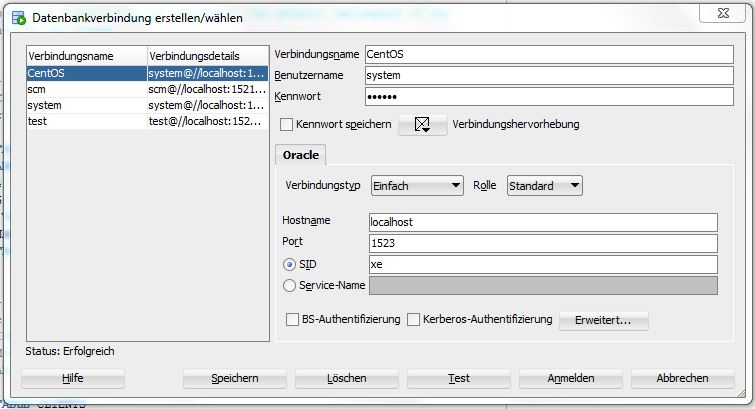
You want to access the database inside of your box from outside the box, i.e. from the guest OS (Windows in my case)? All you have to do is to export some ports to the outside of your box. You do this in your Vagrantfile. My Vagrantfile looks like this:

#
[vagrant@localhost vagrant]$ cat vagrantfile
Vagrant.configure(2) do |config|
  config.vm.box = "geerlingguy/centos7"
  config.vm.network :forwarded_port, guest: 1521, host: 1523, host_ip: "127.0.0.1"
  config.vm.network :forwarded_port, guest: 8080, host: 8888, host_ip: "127.0.0.1"
end

I exposed port 1521 as 1523 for the database and port 8080 as 8888 for Apex. When connecting to the database from Windows, my host OS, these are the ports I have to specify for the connection. Here is an example connecting SqlDeveloper:
Connecting from outside of the box
Remember to specify the exported port to access the database.

That concludes the Oracle XE part. Next, let’s add NodeJS to the box.

4.4 Choose a decent NodeJS Release

Installing NodeJS will be the final task in our engineering project. When this is done, the box is ready to be used in a little development project.

What is important when going for a NodeJS distribution?

When trying to install the oracledb driver into a NodeJS project, we faced this problem:
erreur: ‘REPLACE_INVALID_UTF8’ is not a member of ‘v8::String’
static const unsigned kReplaceInvalidUtf8 = v8::String::REPLACE_INVALID_UTF8;
Some Google research suggested that the V8 engine received a patch recently which led to a new entry for the file “v8.h”, namely ‘REPLACE_INVALID_UTF8’.
It turned out that some NodeJS distributions do not jet have been patched.
To check yours, find the v8.h file in your installation and check for the mentioned property.

We downloaded the NodeJS binary tarball directly from the NodeJS download page and saved it into our “downloads” directory. Then we just followed the install instructions, which go like this:

#
# copy NodeJS binaries to /opt kopieren and untar it
# again, do this as root...
su -
cp  node-v4.2.4-linux-x64.tar.gz /opt
cd /opt
tar -zxf node-v4.2.4-linux-x64.tar.gz
#

Exit the root shell and do the rest as the regular vagrant user.
The path to NodeJS has to be appended to the PATH variable.
Here is the contents of my .bash_profile file afterwards:
#
[vagrant@localhost ~]$ cat .bash_profile

# .bash_profile
# Get the aliases and functions

if [ -f ~/.bashrc ]; then

        . ~/.bashrc

fi

# User specific environment and startup programs
. /u01/app/oracle/product/11.2.0/xe/bin/oracle_env.sh

PATH=/opt/node-v4.2.4-linux-x64/bin:$PATH:$HOME/.local/bin:$HOME/bin
LD_LIBRARY_PATH=$ORACLE_HOME/lib

export LD_LIBRARY_PATH
export PATH

(This may be different for you, depending on the NodeJS version you installed)

To test you NodeJS installation, exit and reenter the shell and ask for the versions of node and npm:

#
[vagrant@localhost ~]$ node -v
v4.2.4
[vagrant@localhost ~]$ npm -v
2.14.12
#
…looks good.

4.5 Package the Box

Our VM is now ready.
To easily make use of it in our development projects, we will package it as a new Vagrant Box to be stored locally for further use.

From within the <eng_root> directory, do this:

#
# package the box:
vagrant package --output centos7_oraclexe_node_01.box
#
# Add the box to the Vagrant System:
vagrant box add centos7_oraclexe_node_01 centos7_oraclexe_node_01.box
#
# delete the box-file
rm centos7_oraclexe_node.box
#

The new Vagrant box is now part of your Vagrant environment:

#
$ vagrant box list
centos7_oraclexe_node_01 (virtualbox, 0)
geerlingguy/centos7      (virtualbox, 1.0.8)
#
As you can see, our new box is listed together with the geerlingguy box which we used as a base box.

We are done with the engineering project.
The new box can now be utilized in our development projects.

5 Development Task

In order to test your new box let’s create a little development project.

5.1 Set up the Vagrant Box

Create a project directory, which we will call <dev_root> from now on.
From within this directory, let Vagrant create a Vagrantfile using the new box from the engineering project:

#
# create the vagrantfile within your <dev_root> directory
vagrant init –m centos7_oraclexe_node_01
#
Afterwards, edit the Vagrantfile so that it looks somewhat like this:
#
Vagrant.configure(2) do |config|
  config.vm.box = "centos7_oraclexe_node_01"
  config.vm.provider "virtualbox" do |v|
    v.name = "mybox"
  end
  config.vm.network :forwarded_port, guest: 1521, host: 1523, host_ip: "127.0.0.1"
  config.vm.network :forwarded_port, guest: 8080, host: 8888, host_ip: "127.0.0.1"
  config.vm.network :forwarded_port, guest: 5000, host: 3000, host_ip: "127.0.0.1"
end
#

The last port forwarding is for the NodeJS http server we will create later. It will be listening von port 5000 in the Guest OS and reachable on port 3000 from the Host OS.
Start up your new box like this:
#
vagrant up


Starting up the box for development
Two remarks here:
  • This screenshot was done after a vagrant reload; your “vagrant up” should produce a similar output
  • I installed the vagrant-vbguest plugin which synchronizes VirtualBox Guest Additions between Host and Guest system (without this plugin you may get some additional warnings)

Anyway, your box is up and running. Oracle XE is listening to you and NodeJS is ready to take your commands.
Let’s set up a NodeJS project.

5.2 Create a NodeJS Project

Follow your favorite path to initializing a NodeJS project.
This example will start with “npm init” from inside the box:
#
# ssh into your box
vagrant ssh
#
# switch into the projects root directory <dev_root>
cd /vagrant
npm init
#
# answer the questions and get a package.json file in return
#
# install express
npm install --no-bin-links express --save


Attention
Did you notice the “--no-bin-links” option?
You have to specify this option when installing any NodeJS module which tries to create SymLinks to binaries within your box (and most modules do…). There seems to be a permission problem between Vagrant/VirtualBox and Windows regarding these SymLinks.
The Npm team recognized the problem and provided the option shown above.

5.3 Install oracledb NodeJS Database Driver

The oracledb NodeJS driver is maintained on Github here.
The project is maintained by christopher.jones@oracle.com. It contains everything you need to get started, like installation instructions, examples and API reference.

Now comes the moment of truth, when we install the oracledb driver:

#
# still inside the box in the /vagrant directory:
# do “npm install oracledb”
[vagrant@localhost ~]$ npm install oracledb
|
> oracledb@1.5.0 install /home/vagrant/node_modules/oracledb
> node-gyp rebuild

make: Entering directory `/home/vagrant/node_modules/oracledb/build'
  CXX(target) Release/obj.target/oracledb/src/njs/src/njsOracle.o
  CXX(target) Release/obj.target/oracledb/src/njs/src/njsPool.o
  CXX(target) Release/obj.target/oracledb/src/njs/src/njsConnection.o
  CXX(target) Release/obj.target/oracledb/src/njs/src/njsResultSet.o
  CXX(target) Release/obj.target/oracledb/src/njs/src/njsMessages.o
  CXX(target) Release/obj.target/oracledb/src/njs/src/njsIntLob.o
  CXX(target) Release/obj.target/oracledb/src/dpi/src/dpiEnv.o
  CXX(target) Release/obj.target/oracledb/src/dpi/src/dpiEnvImpl.o
  CXX(target) Release/obj.target/oracledb/src/dpi/src/dpiException.o
  CXX(target) Release/obj.target/oracledb/src/dpi/src/dpiExceptionImpl.o
  CXX(target) Release/obj.target/oracledb/src/dpi/src/dpiConnImpl.o
  CXX(target) Release/obj.target/oracledb/src/dpi/src/dpiDateTimeArrayImpl.o
  CXX(target) Release/obj.target/oracledb/src/dpi/src/dpiPoolImpl.o
  CXX(target) Release/obj.target/oracledb/src/dpi/src/dpiStmtImpl.o
  CXX(target) Release/obj.target/oracledb/src/dpi/src/dpiUtils.o
  CXX(target) Release/obj.target/oracledb/src/dpi/src/dpiLob.o
  CXX(target) Release/obj.target/oracledb/src/dpi/src/dpiCommon.o
  SOLINK_MODULE(target) Release/obj.target/oracledb.node
  COPY Release/oracledb.node

make: Leaving directory `/home/vagrant/node_modules/oracledb/build'

oracledb@1.5.0 node_modules/oracledb
+-- nan@2.1.0
[vagrant@localhost ~]$

If you see an output like this, without any errors, then it’s done.

5.4 Test your installation

Let’s code a minimal web service to test the installation.
I do this within my Windows host using Webstorm.
Here is a small test server coded in a single file “./app/server.js”:
 
/**
 * Created by vkoster on 14.02.2016.
 * Testing my oracledb installation with a little web-service.
 */
var express = require('express');
var app     = express();
var oracledb = require('oracledb');
    oracledb.outFormat = oracledb.OBJECT;
// listen on port 5000, which is forwarded to 3000 in the Host OS
var port = Number(process.env.port || 5000);

/**
 * url:          /test
 * Method:       get
 * Description: Select all tables owned by the connected user
 */
app.get('/test', function getClients(req, res){
  oracledb.getConnection(
    // param 1: credentials
    {
      user          : "system",
      password      : "system",
      connectString : "localhost/xe"
    },
    // param 2: callback to be called with a connection
    function getTableList(err, connection) {
      if (err) {
        console.error(err.message);
        res.status(400).send({"status ": 400,
          "error": "Message: "+err.message});
        return;
      }
      // we are connected...
      console.log("we are connected...");
      connection.execute(
        // Param 1: statement
        "SELECT table_name " +
        "FROM user_tables",
        // Param 2: callback to be called with result
        function(err, result) {
          if (err) {
            console.error(err.message);
            connection.release(
              function(err) {
                if (err) {
                  console.error(err.message);
                  res.status(400).send({"status": 400,
                    "error": "Message: "+err.message});
                }
              });
            return;
          }
          connection.release(
            function(err) {
              if (err) {
                console.error(err.message);
                res.status(400).send({"status": 400,
                  "error": "Message: "+err.message});
                return;
              }
              console.log("connection released...")
            });
          console.log("we have a result");
          res.status(200).send(JSON.stringify(result));
        });
    } // getTableList
  ); // getConnection
});

// Handle everything else
app.use(function(req, res){
  console.log('route not handled');
  res.status(404).send({"status": 404,
    "error": "route not handled"
  });
});

// App start...
app.listen(port, function nowListening(){
  console.log('Listening on port: '+port);
});
   

"ssh" into your box, switch into the “/vagrant” directory and start the application:

#
# after “vagrant ssh”:
[vagrant@localhost vagrant]$ cd /vagrant
[vagrant@localhost vagrant]$ node ./app/server.js
Listening on port: 5000
 
Remember that the server listens on port 5000 within your box, but this port is forwarded to port 3000 of the Host OS.
Therefor point your browser to this url: http://localhost:3000/test
Access NodeJS via Browser
(user “system” owns quite some tables ?)
… or do the following curl:
#
curl -X GET http://localhost:3000/test
 

Result for curl:
Access NodeJS via curl
Server terminal:
NodeJS Terminal
It’s done.
We have a box containing OracleXE and NodeJS.
We can use this box in our development projects writing NodeJS apps against OracleXE.

6 One unresolved Problem

I cannot spare you one issue I was not able to resolve.
On some occasions, the Oracle TNS listener running inside the box cannot be reached from my Host OS.
The strange thing is that it is running. I can always connect to the database using Sqlplus from inside of the box.
But the database cannot be reached from the outside (Host OS).
The really strange thing here is that while this could be a NAT-ing problem, even the oracledb driver, which also resides inside the box, cannot reach the database.

I’m using two workarounds to overcome this:
Reloading the box while being disconnected from the network
Using password authentication in the Vagrantfile (makes Vagrant insert new ssh key pairs into the Guest OS)

It would be great if anyone could shed some light on this problem.
Please send me a comment!

7 Was it worth it?

There is no alternative to using oracledb NodeJS driver if you want to access an Oracle database from within NodeJS. If you are in Windows, installing directly on your Host OS may not be the best of ideas.

Using Vagrant we now have a stable and very reproducible environment that can be easily shared with others across different host systems.
This alone would be reason enough for me to keep on working like this.

By having Vagrant expose the database to the host machine, we can use already installed tooling like e.g. SqlDeveloper by just configuring a new connection. If you are a SqlPlus guy you can of course use this from within the VM. It’s up to you.
As Vagrant automatically shares your project’s root directory between the Window’s host and the VM, you can use your favorite IDE to edit your files and then run them on Node from within the VM.

Ok, there is this SymLink issue and the occasional problem with Oracle's tns-listner (guess I have to dig deeper with this one).
But apart from this, I’m a happy developer. I learned to love Vagrant boxes use them all around by now.

8 Summery

Here’s a short list of things to look out for:

  • Go for a CentOS 64 Bit Base Image
  • See that binutils is of version 2.23.52.0.1 or higher
  • See that your Compiler is of version 4.8.5 or higher
  • Check your NodeJS installation for the property "REPLACE_INVALID_UTF8" in v8.h
  • Follow the oracledb installation instructions closely, especially regarding environment variables
  • Install additional NodeJS modules with the –no-bin-links option
Have fun.

9 References

  • "Pro Vagrant" Book
  • The oracledb Github project
  • And too many blogs and Stackoverflow entries to mention here, every one of them much appreciated and highly regarded.